Welcome to the vibrant world of crochet! Unveiling the mesmerizing crochet brick stitch, a technique that adds depth, dimension, and undeniable charm to your creations. Renowned for its textured appearance resembling interlocking bricks, this stitch elevates the art of crocheting to a whole new level. Its versatility knows no bounds; imagine cozy blankets, stylish scarves, trendy bags, and intricate afghans, all adorned with the captivating brick-like design.
With its distinctive pattern resembling stacked bricks, the crochet brick stitch isn't merely a stitch; it's an invitation to explore creativity boundlessly. Elevate your crochet game as you weave through rows, creating a visually stunning texture that adds depth and character to any project.
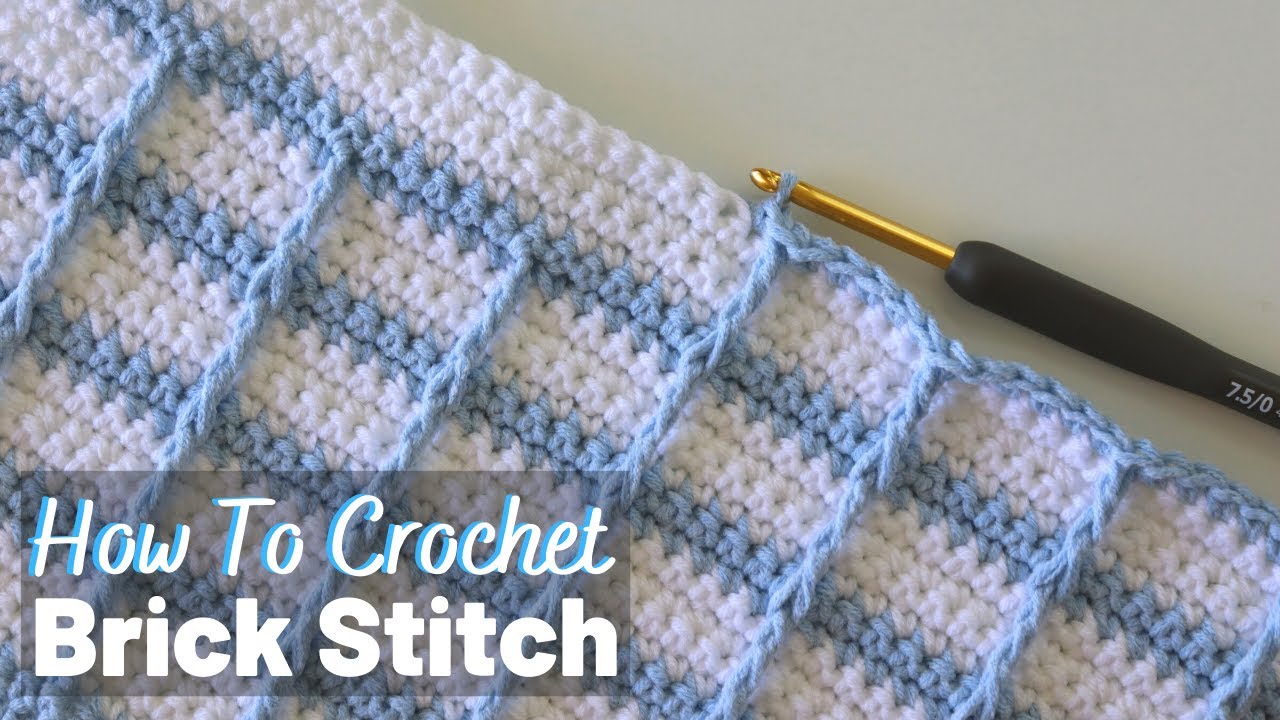
What Is The Crochet Brick Stitch?
The brick stitch, also known as the block stitch, is a charming crochet pattern that mimics the look of, you guessed it, bricks! It's a deceptively simple stitch, made up of alternating rows of single and double crochets, but it creates a stunning textured fabric with a delightful visual dimension.
Appearance And Characteristics
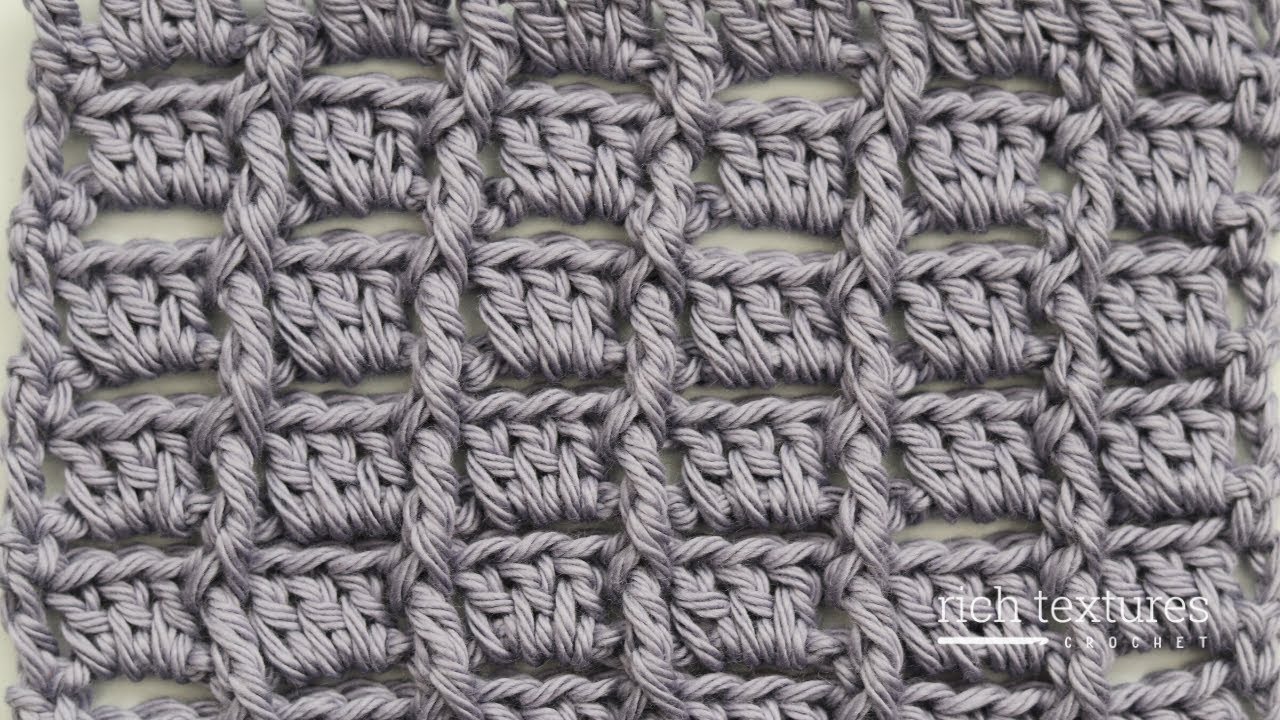
- Textured and ribbed -The alternating stitch heights of single and double crochets create a lovely ribbed effect, resembling stacked bricks with mortar lines in between.
- Reversible -This stitch looks the same on both sides, making it ideal for projects like scarves, blankets, and potholders where both sides are visible.
- Dense and sturdy -The combination of single and double crochets creates a thick and stable fabric, perfect for projects that need some heft, like bags and baskets.
- Multicolor friendly -The brick stitch shines when worked in two or more colors, showcasing the "mortar" and "brick" sections beautifully.
Common Uses And Popularity
The brick stitch's versatility makes it a popular choice for various crochet projects
- Blankets and throws -The stitch's warmth and visual interest make it ideal for cozy blankets and throws.
- Scarves and cowls -The reversible nature and beautiful texture make it perfect for neckwear.
- Hats and beanies -The dense fabric provides warmth and structure for hats.
- Bags and baskets -The sturdy fabric and customizable colors make it perfect for practical and stylish containers.
- Home decor items -Potholders, coasters, and pillow covers all benefit from the stitch's texture and charm.
Crocheters adore the brick stitch for its ease of learning, stunning visual impact, and versatility. It's a stitch that's both beginner-friendly and offers room for creativity with color changes and project variations. Whether you're a seasoned crocheter or just starting out, the brick stitch is a delightful addition to your crochet repertoire.
Tools And Materials Needed
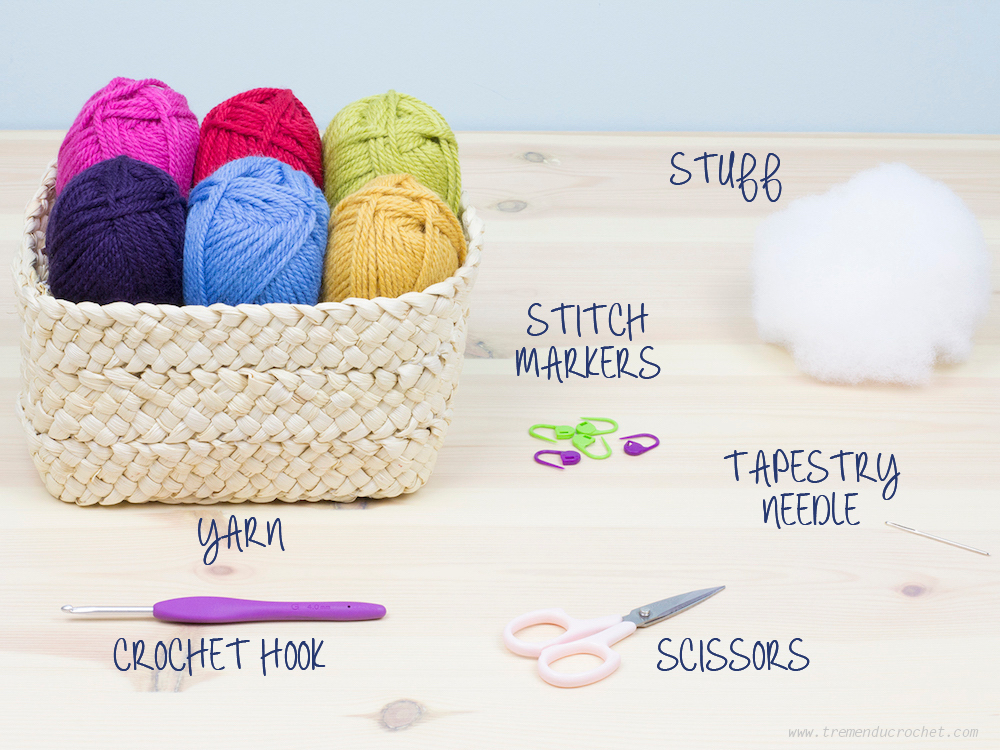
The beauty of the brick stitch lies in its simplicity. You'll need minimal tools and materials to get started, making it an accessible project for crocheters of all levels. Here's what you'll need:
1. Yarn
- Type -The brick stitch works well with various yarn weights, but worsted weight yarn is a popular choice for its balance of thickness and ease of working with. You can experiment with lighter or heavier weights depending on your desired project size and feel.
- Color -The stitch truly shines when worked in two or more colors, emphasizing the "brick" and "mortar" sections. Beginners can opt for classic combinations like beige and brown, while more adventurous crocheters can explore vibrant or contrasting colors.
2. Crochet Hook
Size -Choose a hook size one or two sizes larger than recommended for your chosen yarn weight. This will create a looser fabric, ideal for showcasing the stitch's texture. For worsted weight yarn, a 5mm or 6mm hook is a good starting point.
3. Other Materials
- Tapestry needle -This will be helpful for weaving in ends and adding finishing touches.
- Scissors -To cut your yarn, of course!
- Stitch markers (optional) -These can help mark the beginning and end of your rows, especially for beginners.
Recommendations For Beginners
- Start with worsted weight yarn and a size 6mm hook -This combination creates a comfortable working yarn size and allows for easier stitch definition.
- Choose classic color combinations like beige and brown -for your first project. This will help you focus on learning the stitch pattern without too much color complexity.
- Don't be afraid to experiment with different yarn weights and textures -once you're comfortable with the basic stitch. Bulky yarn can create a dramatic brick effect, while finer yarn adds a delicate touch.
Basic Skills Required
Before diving into the charming intricacies of the brick stitch, having a grasp of some key foundational crochet skills will make the learning process smoother and more enjoyable. Here's a quick rundown of what you'll need in your crochet toolbox:
Essential Stitches
- Chain (ch) -This basic stitch forms the foundation of many crochet projects, including the brick stitch. Knowing how to chain comfortably and consistently is crucial.
- Single crochet (sc) -This stitch, the building block of many patterns, forms the "mortar" lines in the brick stitch. Be confident in working single crochets in both the front loop and back loop of the previous row, as the brick stitch utilizes both techniques.
- Double crochet (dc) -This slightly taller stitch forms the "bricks" in the brick stitch. Mastering double crochets will ensure you create the textured look and dimension of the pattern.
Other Techniques
- Skipping stitches -Knowing how to skip stitches accurately is vital for the brick stitch, as you'll skip over certain stitches to create the characteristic spacing and pattern.
- Turning your work -You'll be alternating rows in the brick stitch, so understanding how to turn your work neatly and consistently is essential.
- Reading crochet patterns -While the brick stitch itself is fairly straightforward, familiarizing yourself with basic crochet pattern symbols and abbreviations will allow you to explore further variations and projects.
Bonus Skills
- Changing colors -Although not required for the basic brick stitch, knowing how to seamlessly change colors will open up a world of possibilities for adding pops of contrast and visual interest to your projects.
- Weaving in ends -No one wants loose ends! Learning how to neatly weave in your yarn ends will give your finished project a professional touch.
Step-by-Step Guide To The Brick Stitch

Ready to build your own textured crochet masterpiece? Let's delve into the delightful world of the brick stitch! This guide will walk you through the steps, complete with helpful visuals and tips.
Materials
- Yarn (worsted weight recommended) in two or more colors
- Crochet hook (one or two sizes bigger than recommended for your yarn)
- Tapestry needle
- Scissors (optional: stitch markers)
Step 1 - Chain Up!
Start by making a foundation chain in a multiple of 4 + 2. For example, if you want a project about 15 stitches wide, chain 64 (4 x 15 + 2).
Step 2 - Mortar Row (Row 1)
- Work single crochets (sc) in the second chain from the hook and each chain across.
- Chain 1 and turn your work.
Step 3 - Brick Row (Row 2)
- Skip the first stitch.
- Work 3 double crochets (dc) in the next chain space (formed by two sc in the row below).
- Skip the next sc.
- Repeat steps 3a and 3b across the row.
- Chain 1 and turn your work.
Step 4 - Repeat And Build!
- Repeat steps 2 and 3 to alternate between "mortar" (sc) rows and "brick" (dc) rows.
- Remember to change colors at the end of each mortar row for the contrasting "bricks."
- Keep in mind that every dc row starts with a skipped stitch and works 3 dc into the space created by the two sc stitches below.
Tips And Tricks
- Maintain consistent tension for neat and even rows.
- If you find it tricky to work dc into the space between sc stitches, use a stitch marker to mark the spot.
- Experiment with different color combinations for creative and personalized projects.
- Don't be afraid to adjust the yarn weight and hook size for a desired fabric thickness.
Bonus Round
Once you've mastered the basic brick stitch, explore variations like
- Diagonal brick stitch -Creates a slanted brick effect.
- Moss stitch with brick accent -Combines the textured moss stitch with brick rows for a unique look.
- Crochet cables with brick stitch borders -Adds a stunning textured element to your project.
The possibilities are endless! So grab your hook, unleash your creativity, and build your own brick stitch masterpieces. Happy crocheting!
Common Mistakes And How To Avoid Them
Mistake 1 - Skipping Stitches Inconsistently
Symptom -Uneven rows, gaps in the pattern, or extra stitches appearing.
Cause -Forgetting to skip stitches in the "brick" rows or skipping the wrong number of stitches.
Tip -Count carefully! Remember, every "brick" row starts by skipping the first stitch and working 3 dc in the next space. Use stitch markers if needed to mark the skip points.
Mistake 2 - Working Dc In The Wrong Loop
Symptom -Bricks (dc) looking twisted or leaning at an angle.
Cause -Working dc in the front loop instead of the back loop (or vice versa) in the "brick" rows.
Tip -Pay attention to your working loops! Ensure you're inserting your hook into the top two loops of the single crochet stitches below for the correct dc placement.
Mistake 3 - Uneven Tension
Symptom -Loose or tight stitches, bumpy fabric, inconsistent row height.
Cause -Inconsistent yarn tension while working.
Tip -Practice maintaining a consistent yarn tension throughout your stitches. Relax your grip, let the yarn flow smoothly, and aim for evenly spaced stitches.
Mistake 4 - Difficulty Working Dc Into Tight Spaces
Symptom -Struggling to insert your hook or complete the dc stitch.
Cause -The space between single crochets might feel tight for the triple crochet in the "brick" row.
Tip -Use a slightly larger hook size than recommended for your yarn if needed. Work the dc stitches slowly and patiently, ensuring you catch both loops correctly.
Mistake 5 - Misreading The Pattern Or Instructions
Symptom -Confusion about stitch placement, color changes, or row repeats.
Cause -Not carefully reading or understanding the written instructions or pattern symbols.
Variations Of The Brick Stitch
The charming world of the brick stitch offers delightful twists and turns beyond the basic form. Let's dive into some popular variations that will add an extra touch of personality and texture to your crochet creations:
1. Diagonal Brick Stitch
How it differs -Instead of straight rows, this variation creates a slanted brick effect by shifting the dc placement in each "brick" row.
Where to use it -Perfect for scarves, blankets, and throws, where the diagonal lines add visual interest and a dynamic flow.
2. Moss Stitch With Brick Accent
How it differs -Combines the textured with moss stitch(made of chains and single crochets) with occasional rows of brick stitch for a unique blend of textures.
Where to use it -Ideal for cozy hats, cowls, and sweaters, where the moss stitch provides warmth and the brick stitch adds a subtle accent.
3. Half Double Brick Stitch
How it differs -Uses half double crochets instead of regular dc in the "brick" rows, creating a slightly smaller and denser brick effect.
Where to use it -Great for bags, baskets, and potholders, where the denser fabric provides additional structure and stability.
4. Triple Brick Stitch
How it differs -Increases the drama by working 4 dc in each space instead of 3, creating larger and bolder "bricks."
Where to use it -Makes a statement in wall hangings, throws, and pillows, where the oversized bricks capture attention.
5. Cable Brick Stitch
How it differs -Incorporates raised cable elements alongside the brick stitch, adding depth and dimension to the pattern.
Where to use it -Elevates sweaters, hats, and scarves with a sophisticated and textured look.
Remember
- Each variation can be further customized with color changes and stitch counts.
- Consider the overall design of your project when choosing a variation.
- Practice on swatches before starting your main project to get a feel for the new stitch pattern.
Caring For Brick Stitch Creations
Your stunning brick stitch creations deserve just as much love and care as you put into making them! Here are some tips to keep your projects looking fresh and fabulous:
Washing
1. Handwashing -This is the safest option for most brick stitch projects. Use lukewarm water, gentle laundry detergent, and avoid vigorous scrubbing. Rinse thoroughly and lay flat to dry.
2. Machine washing -If the yarn label allows, choose a delicate cycle with cold water and mild detergent. Place the item in a mesh laundry bag for extra protection. Lay flat to dry or tumble dry on the lowest heat setting.
Blocking
Blocking can help even out your stitches and enhance the textured beauty of the brick stitch. Use blocking wires or pins to gently stretch the fabric to its intended dimensions. For projects with cables or textured elements, consult specific blocking techniques to maintain their desired shape.
Storage
- Store your brick stitch projects in a cool, dry place away from direct sunlight and pests.
- Avoid folding or creasing items with intricate textures like the brick stitch. Consider rolling them loosely or storing them flat depending on the project.
- Use cedar blocks or lavender sachets to deter moths and keep your yarn smelling fresh.
Additional Tips
- Use a yarn suitable for washing and drying if you know your project will be used frequently.
- For heavily stained items, treat the stain before washing, but always test any cleaning solution on an inconspicuous area first.
- Regularly brush or lint-roll your projects to remove dust and surface debris.
- Don't iron directly on the crochet fabric. Place a pressing cloth between the iron and your project to avoid flattening the texture.
Tip -Take your time to read the instructions and pattern symbols thoroughly. If anything is unclear, don't hesitate to look for online tutorials or ask for help from experienced crocheters.
Practice makes perfect! Start with mastering the foundational stitches and techniques before tackling the brick stitch. Don't be afraid to slow down, ask for help, and enjoy the process of learning and creating. Your first brick stitch project might not be a masterpiece, but the satisfaction of building your skills and witnessing your progress is truly rewarding.
See Also: How To Crochet The Yoyo Puff