
Welcome to the transformative world of crochet mastery, where the subtle yet mighty techniques of invisible Crochet decreases and increasesreign supreme. In the realm of crochet crafting, these techniques are nothing short of magical, acting as the hidden threads that weave together a seamless, polished finish in your creations. Think of them as the secret ingredients that elevate your work from good to exceptional, granting you the power to sculpt intricate designs with unmatched precision.
Invisible decreases and increases are the unsung heroes of crochet, wielding immense influence in the final aesthetics of your projects. These techniques, while seemingly elusive, hold the key to eliminating unsightly gaps or bulges in your stitches, granting your fabric a smooth and professional appearance.
Understanding The Basics Of Crochet
Absolutely! Crochet is a wonderful world of yarn and creativity, and mastering the basics is the key to unlocking its endless possibilities. Before diving into intricate stitches and complex patterns, let's weave the foundation with some essential crochet stitches and techniques.
1. The Mighty Chain Stitch
The chain stitch (ch) is the building block of crochet. It's the first step in any project and forms the base for rows and foundations. To make a chain stitch
- Make a loop with the yarn.
- Hold the hook under the loop and grab the yarn with the hook.
- Pull the yarn through the loop to create a new loop on your hook.
Repeat this process to make a chain of desired length. Remember, the first chain stitch doesn't count as a stitch in most patterns.
2. The Versatile Single Crochet (SC)
The single crochet (sc) is the most fundamental stitch, creating a dense and sturdy fabric. To work a sc
- Insert your hook into the next chain stitch (or stitch, depending on the pattern).
- Yarn over (yo) and pull up a loop.
- Yo again and pull through both loops on your hook.
Repeat in each chain or stitch as instructed in the pattern.
3. The Taller Double Crochet (DC)
The double crochet (dc) is similar to the sc but creates a taller stitch, resulting in a looser fabric. To work a dc
- Insert your hook into the next chain or stitch.
- Yo and pull up a loop.
- Yo again and pull through two loops on your hook.
- Yo once more and pull through the remaining two loops on your hook.
Repeat in each chain or stitch as instructed in the pattern.
4. The Turning Chain
At the end of each row, you'll usually need to turn your work to start the next row. This is where the turning chain comes in. Simply chain the number of stitches specified in the pattern (usually 1 or 2) to count as your first stitch of the next row.
5. Slip Stitching Your Way
The slip stitch (sl st) is a handy stitch used for joining seams, attaching motifs, and working in tight spaces. To work a sl st
- Insert your hook into the next stitch.
- Yo and pull through both the loop on your hook and the stitch.
Repeat in each stitch as instructed in the pattern.
Bonus Tip - Tension is Key
Maintaining consistent tension (the tightness of your stitches) is crucial for even and neat crochet fabric. Practice makes perfect, but don't be discouraged if your tension isn't perfect at first. Just keep crocheting and adjusting as needed!
Tools And Materials Required
Crocheting unlocks a world of creative possibilities, and mastering the tools and techniques allows you to bring your yarn-based dreams to life. When venturing into advanced elements like invisible increases and decreases, having the right equipment is key to achieving seamless, professional-looking results. Let's explore the essential tools and materials you'll need, with a specific focus on the heroes of invisibility:
1. Crochet Hooks
- Type -The holy grail of every crocheter, your hook choice impacts everything from project type to comfort. For invisible increases and decreases, consider aluminum or bamboo hooks, known for their smooth glide and stitch definition. Steel hooks offer exceptional durability but can snag delicate yarns.
- Size -Opt for hook sizes half a size smaller than recommended for your yarn to encourage tighter stitches and minimize gaps where increases and decreases occur. This helps create a smooth, invisible transition.
2. Yarn
- Type -Choose smooth, tightly-spun yarns like mercerized cotton, bamboo, or fine wool. These yarns hold their shape well, minimizing unwanted gaps and making it easier to manipulate stitches for invisible techniques. Avoid fuzzy or thick yarns, as they can obscure stitch definition and make invisibility a challenge.
- Weight -Stick to fine or light weight yarns (usually categorized as #2 or #3)for delicate, precise work. Heavier yarns might be harder to control and achieve the level of invisibility required for these advanced techniques.
3. Stitch Markers
- Type -These little lifesavers mark specific stitches within your work, keeping track of where to increase or decrease and ensuring seamless transitions. Look for locking stitch markers that stay put, especially helpful when dealing with intricate manipulations.
- Quantity -Grab a generous pack! Stitch markers tend to disappear into yarn galaxies as mysteriously as socks in dryers.
4. Tapestry Needle
Type -You'll be weaving in ends and potentially attaching pieces with invisible seams, so a good tapestry needle is essential. Choose one with a large eye to accommodate thicker yarns and a blunt tip to avoid splitting delicate fibers.
5. Scissors
Type -Sharp, precise scissors are crucial for snipping yarn cleanly without fraying. Look for embroidery or craft scissors designed for delicate threads.
Bonus Tips
- Good Lighting -Proper lighting allows you to see each stitch clearly, crucial for precise work with invisible techniques.
- Magnifying Glass -For extra intricate projects, a magnifying glass can be your superhero, zooming in on details for ultimate stitch control.
- Practice Makes Perfect -Don't be discouraged if your first attempts at invisible increases and decreases aren't invisible yet. Patience, practice, and the right tools will make you a master of seamless crocheted magic!
Invisible Decrease Technique
Crochet's beauty lies in its versatility, and mastering advanced techniques like the invisible decrease takes your projects to the next level. This stitch creates seamless transitions, perfect for amigurumi or any project where smooth curves are desired. Let's dive into a step-by-step guide with clear instructions and helpful visuals to equip you for invisible crocheting success!
Materials
- Crochet hook suitable for your yarn size (half a size smaller recommended for invisible decreases)
- Yarn (smooth, tightly-spun, fine or light weight)
- Stitch marker (optional)
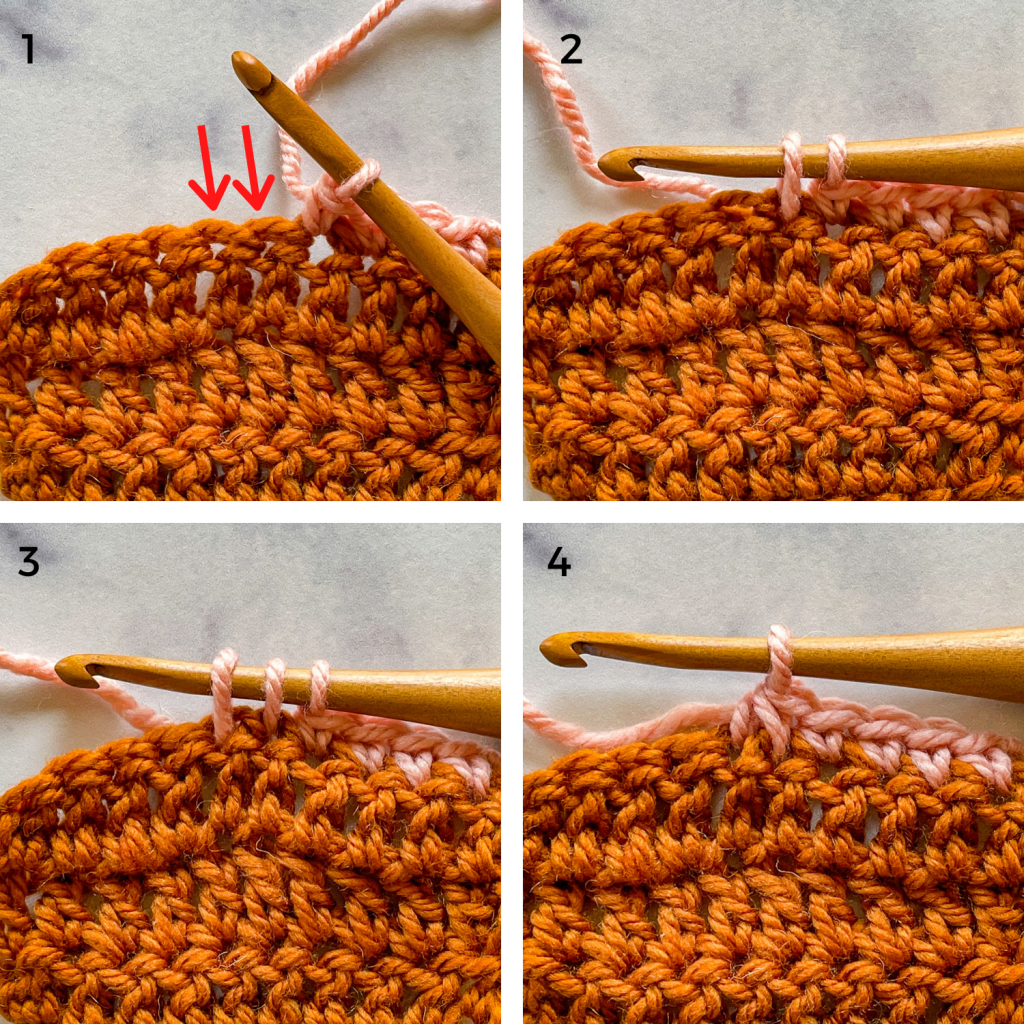
Instructions
1. First Stitch -Insert your hook under the front loop of the next stitch.
2. Right Side Facing -Ensure you're working on the right side of your project. You'll be working with front loops of stitches for this technique.
3. Second Stitch -Without pulling up a loop, insert your hook under the front loop of the next stitch. You should have two loops on your hook.
4. Yarn Over & Pull Through -Yarn over and pull through both loops on your hook.
5. Yarn Over & Pull Through -Yarn over again and pull through the remaining two loops on your hook.
6. Voila -You've completed the invisible decrease! You've now joined two stitches into one seamlessly.
Tips
- Maintain Tension - Keeping consistent tension is crucial for a smooth, invisible finish. Practice makes perfect!
- Stitch Markers -Use a stitch marker to mark the first stitch involved in the decrease to aid in placement.
- Practice Makes Perfect -Don't be discouraged if your first attempts aren't entirely invisible. Keep practicing, and you'll soon be crocheting magic!
Invisible Increase Technique
Crochet's beauty lies in its ability to transform yarn into intricate shapes and textures. The invisible increase takes this transformation to another level, allowing you to seamlessly expand your fabric without visible bumps or gaps. Whether you're shaping an amigurumi head or creating a garment with smooth curves, mastering this technique will unlock a world of possibilities. Now, grab your hook and yarn, and let's dive into the secrets of crocheting invisibility!
Materials
- Crochet hook suitable for your yarn size (half a size smaller recommended for invisible increases)
- Yarn (smooth, tightly-spun, fine or light weight)
- Stitch marker (optional)
Instructions
1. Yarn Over & Pull Through -Start by yarning over and pulling up a loop in the same stitch where you want to increase.
2. Right Side Facing -Ensure you're working on the right side of your project. You'll be working with both loops of stitches for this technique.
3. Insert Hook (Front Loop) -Without pulling up another loop, carefully insert your hook under the front loop of the next stitch.
4. Yarn Over & Pull Through -Yarn over again and pull through both the loop on your hook and the front loop of the next stitch. You now have two loops on your hook.
5. Insert Hook (Both Loops) -Without pulling up another loop, carefully insert your hook through both loops of the same stitch where you started the increase.
6. Yarn Over & Pull Through -Yarn over one final time and pull through all three loops on your hook.
7. Complete the Stitch -You've now successfully created an invisible increase! Continue working the following stitches as instructed in your pattern.
Tips
- Maintain Tension -Consistent tension is key for a smooth, invisible finish. Practice makes perfect!
- Stitch Markers -Use a stitch marker to mark the first stitch involved in the increase to aid in placement.
- Practice Makes Perfect -Don't be discouraged if your first attempts aren't entirely invisible. Keep practicing, and you'll soon be crocheting invisible masterpieces!
Troubleshooting Common Issues
The allure of invisible crochet techniques lies in their seamless beauty, but the learning curve can sometimes throw curveballs of its own. Worry not, fellow crocheters! We've all grappled with gaps, bumps, and misplaced increases, but with some troubleshooting tips, you'll be weaving invisible magic like a pro in no time. So, let's tackle those common hiccups:
Problem - Visible Gaps Or Holes Around Increases/decreases.
Solution
- Tension is key -Consistent, slightly tighter tension minimizes gaps. Practice makes perfect!
- Hook size matters -Consider using a half size smaller hook than recommended for your yarn for tighter stitches.
- Yarn choice -Opt for smooth, tightly-spun yarns that hold their shape well. Avoid fuzzy or thick yarns for invisibility.
- Stitch placement -Double-check stitch placement, ensuring you're working into the correct loops for each technique.
Problem - Uneven Bumps Or Lumps Around Increases/decreases.
Solution
- Yarn overs, not unders -Ensure you're yarning over correctly (clockwise around the hook) to avoid uneven loops.
- Pull evenly -When pulling through loops, maintain even tension to avoid bumps.
- Stitch markers -Use stitch markers to track your increase/decrease points and maintain their alignment.
Problem - Difficulty Seeing Stitches For Precise Placement.
Solution
- Good lighting -Work in well-lit areas to clearly see your stitches.
- Magnifying glass -For extra help with intricate work, consider using a magnifying glass for better stitch definition.
- Contrast -Choose yarn colors that contrast with your hook for easier visibility.
Problem - Frustration And Loss Of Crocheting Mojo!
Solution
- Take a break -Step away from your project if you're feeling frustrated. Come back with fresh eyes and renewed patience.
- Practice makes perfect -Don't be discouraged by initial challenges. Keep practicing, and you'll gradually master the techniques.
- Seek help -Online tutorials, crochet communities, and experienced friends can offer guidance and support.
Advanced Tips And Tricks
The invisible world of crochet beckons, and you've already mastered the basics! Now, let's take your invisible increases and decreases to the next level with some pro tips and tricks. Get ready to refine your technique, blend seamlessly into patterns, and elevate your crocheted creations to invisible magic masterpieces.
Tension Titans - Mastering The Even Stitch
- Hook it Up -Experiment with different hook sizes to find the one that creates the tightest, most even stitches for your yarn. Remember, a half size smaller than recommended can work wonders for invisible techniques!
- Grip it and Rip it (Gently!) -Adjust your yarn grip to control tension. Hold the yarn looser for looser stitches and tighter for firmer ones. Practice finding the sweet spot for evenness.
- Count on Your Fingers -Develop a consistent rhythm when yarning over and pulling through loops. This helps maintain tension and prevents unevenness.
Seamless Blending - Integrating Invisibility Into Patterns
- Pattern Planning -Scrutinize your pattern before diving in. Look for opportunities to strategically place invisible increases and decreases at the beginning or end of rows, near seams, or in areas with natural curves.
- Mirror, Mirror on the Wall -When working invisible decreases, consider alternating their direction (front loop or back loop) each time to avoid creating a visible slant in your fabric.
- Practice Makes Perfect -Don't be afraid to swatch with your chosen yarn and hook size before starting your actual project. This allows you to fine-tune your tension and practice blending invisibility seamlessly.
Bonus Tricks For The Invisible Elite
- The Slip Stitch Savior -For extra stealthy invisible decreases, try incorporating a slip stitch between the final yarn over and pull through. This further minimizes any visible gap.
- The Foundation Friend -When starting a project with invisible increases, consider working the first row or two in standard single crochets before transitioning to invisibility. This provides a solid foundation and minimizes any potential wobbliness.
- The Chain Chain Challenge -For invisible decreases, avoid chaining one to turn at the end of the row. Instead, work into the top loop of the final decrease to maintain seamlessness.
Mastering invisibility takes dedication and a touch of experimentation. Embrace the learning process, celebrate your progress, and most importantly, have fun! With these advanced tips and your passion for crochet, you'll soon be weaving invisible masterpieces that leave everyone in awe. Now go forth and conquer the world of seamless crocheted magic!
See Also: How To Decrease & Increase The Diamond Mesh Stitch